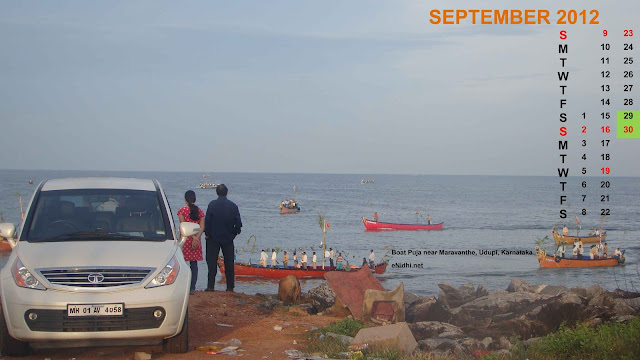
Make custom calendar wallpapers using Photoshop
Arun Bhat and Prashanth used to regularly publish some of their photos with calendars superimposed. I hardly edit my photos and never bothered about creating a calendar.
Recently I got the urge to make calendars out of my pics- this way users will have more reasons to use them. I was searching for a free online tool which could help me create calendar. The search went in vein. Most of the sites I found were mainly for desktop calendars- i.e. half page for photo, half page for calendar table. What I wanted was to superimpose calendar table on top of an image. There were no good sites to do this.
Eventually few, including Harsha Koda, suggested photoshop. I hardly had any exposure to it and was always keeping it as last option. I had thought it is too tough to learn it. Eventually I decided to try. Some online tutorials and lots of experiments later, I was successful.
In this post sharing the steps to follow to create a custom calendar in Photoshop. If you're photoshop expert, feel free to skip this. Else you might wish to know how to make calendars out of your pics, read further.
Step One- prepare the calendar part. Visualize how your calendar should look like, arrange the dates in preferred order (A 7 by 5 table? or 31 * 1 horizontal table? or 14* 3 horizontal or vertical table etc, as you wish. It helps to keep the photo in mind, while preparing the table, so that you can use contrasting colour combination and position the calendar section in a place where it does't cover the main object of the photo. You can make this in a MS word or Powerpoint easily. Add any other text you may wish to have
Step Two: Save this calendar format as a PDF.
Step 3: Go to Photoshop, File-New. Fill up the details as below. (Chose the right pixel/inch values you may wish to have. If in doubt, use the dimensions of the photograph which you're planning to convert into calendar.)
Step 4: Go to File-Place, select the photo which you wish to convert to calendar. Resize if required, else hit Enter (or click on Commit Transform)
Step 5: Repeat the process to select the pdf which contains calendar template. This gets superimposed on the previously selected image. If the visibility is compromised due to wrong colour combination or bad positioning, edit your template to select right colour and position, save it again as PDF and repeat this process. Commit the transform once satisfied

Your calendar is now ready. Do save as and then you know what to do.
In case you're interested, 2012 calendars featuring Aria pics can be seen here. You can also download high res pictures.
Recently I got the urge to make calendars out of my pics- this way users will have more reasons to use them. I was searching for a free online tool which could help me create calendar. The search went in vein. Most of the sites I found were mainly for desktop calendars- i.e. half page for photo, half page for calendar table. What I wanted was to superimpose calendar table on top of an image. There were no good sites to do this.
Eventually few, including Harsha Koda, suggested photoshop. I hardly had any exposure to it and was always keeping it as last option. I had thought it is too tough to learn it. Eventually I decided to try. Some online tutorials and lots of experiments later, I was successful.
In this post sharing the steps to follow to create a custom calendar in Photoshop. If you're photoshop expert, feel free to skip this. Else you might wish to know how to make calendars out of your pics, read further.
Step One- prepare the calendar part. Visualize how your calendar should look like, arrange the dates in preferred order (A 7 by 5 table? or 31 * 1 horizontal table? or 14* 3 horizontal or vertical table etc, as you wish. It helps to keep the photo in mind, while preparing the table, so that you can use contrasting colour combination and position the calendar section in a place where it does't cover the main object of the photo. You can make this in a MS word or Powerpoint easily. Add any other text you may wish to have
Step Two: Save this calendar format as a PDF.
Step 3: Go to Photoshop, File-New. Fill up the details as below. (Chose the right pixel/inch values you may wish to have. If in doubt, use the dimensions of the photograph which you're planning to convert into calendar.)
Step 4: Go to File-Place, select the photo which you wish to convert to calendar. Resize if required, else hit Enter (or click on Commit Transform)
Step 5: Repeat the process to select the pdf which contains calendar template. This gets superimposed on the previously selected image. If the visibility is compromised due to wrong colour combination or bad positioning, edit your template to select right colour and position, save it again as PDF and repeat this process. Commit the transform once satisfied

Your calendar is now ready. Do save as and then you know what to do.
In case you're interested, 2012 calendars featuring Aria pics can be seen here. You can also download high res pictures.


![Sigandur temple, ferry ride, timings, Holebagilu [Updated Dec 2022]](https://blogger.googleusercontent.com/img/b/R29vZ2xl/AVvXsEj2hLIXbpeV0U6hmr_04DtWelyOJyPBx8gzq8DjpjWlkK15icagnSeT0wXMhIHwHUf9pfqyfHjkvyWD6YsonX6jaYyY8LP3krbH19hedeEy5ZpWHe2fzho97DmJ4rtdpMpz3B9U-WT4HL74TjxpwsUCOGbYwQJ583CQONVnqJ2xdiTkpxNWjuI/s72-w400-c-h225/barge.jpg)

Thanks for sharing this. I hope you make good sales.
ReplyDeleteI am not selling it in hard copy.. it is free for graps for anyone.
ReplyDeleteSo, no money to be made
Good useful one.. I have not tried too much of manipulations in photoshop.. Will try this when I get time..
ReplyDeleteRam
Ram:
ReplyDeleteDo try